
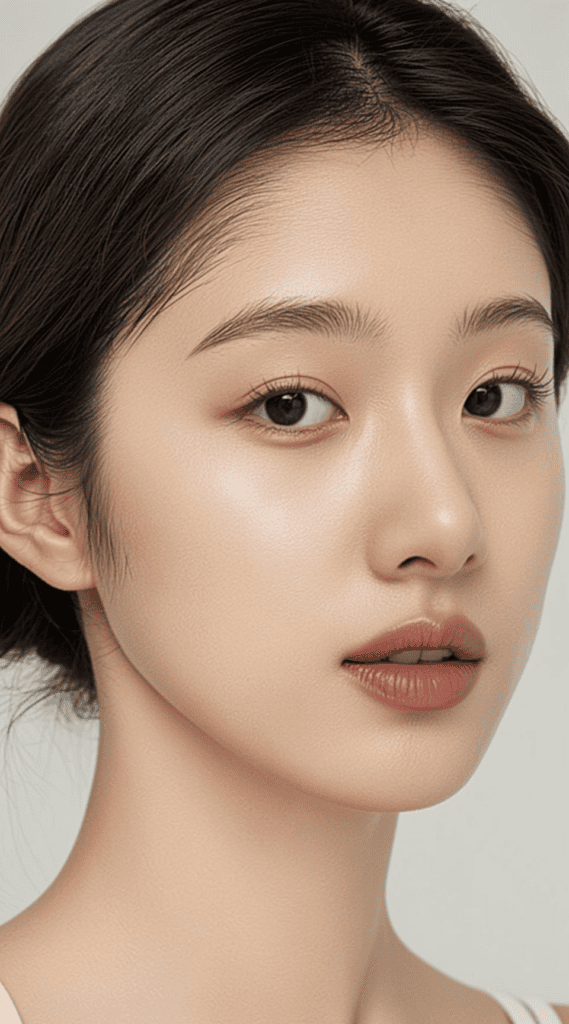
Welcome to the ultimate glass skin makeup tutorial for beginners. Glass skin is not oily skin with highlighter on top. That is a common misunderstanding that leads to people applying five layers of shimmer and wondering why their face looks reflective in the wrong way. Real glass skin has a specific quality — the skin appears smooth, translucent, and luminous from within, like light is passing through a clean pane of glass rather than bouncing off a greasy surface.

The difference matters because the technique required to achieve real glass skin is completely different from the technique for a standard dewy finish. Dewy skin is about surface sheen. Glass skin is about skin that looks so well-hydrated and even-textured that it appears to glow on its own, with makeup enhancing that quality rather than creating it from scratch.
This distinction is what makes glass skin achievable for beginners — you do not need advanced contouring skills or a drawer full of luxury products. You need the right skincare prep, lightweight products applied in the correct order, and an understanding of where to add luminosity and where to keep things matte.
The Non-Negotiable Prep Step That Most Tutorials Skip

Almost every glass skin makeup tutorial jumps straight to primer and foundation. The problem is that glass skin is 60% skincare prep and 40% makeup. If the skin underneath is dehydrated, flaky, or uneven, no amount of luminous foundation will create the glass effect — it will just highlight the texture problems.
The prep does not need to be complicated. A simplified version that actually works looks like this:
- Cleanse gently: A hydrating cleanser, not a stripping one. The skin should feel soft after cleansing, not tight. Tightness means you have removed too much of the natural moisture barrier.
- Hydrating toner: Pat it in — do not swipe. Patting pushes the product into the skin rather than across it. Two to three layers of a hydrating toner (something with hyaluronic acid, glycerin, or centella asiatica) plumps the skin noticeably within minutes.
- Lightweight serum: A single hydrating serum is enough. Niacinamide works well for most skin types because it hydrates while also calming redness and smoothing texture. Apply it while the toner is still slightly damp — this helps the serum absorb more effectively.
- Moisturizer: This is where people make the biggest mistake — skipping moisturizer because they think it will make their makeup slide off. The opposite is true. Well-moisturized skin holds makeup better and looks smoother underneath it. Use a gel-cream formula if you are worried about heaviness.
- Sunscreen: Even if you are doing your makeup indoors for content, get in the habit. A lightweight chemical sunscreen absorbs quickly and does not leave the white cast that ruins glass skin’s translucent quality.
Wait at least 3-5 minutes after sunscreen before touching your face with makeup. This lets everything absorb and settle. If you apply foundation over sunscreen that has not fully absorbed, you get pilling — those annoying little rolls of product that ruin the smooth base glass skin requires.
Step 1: Primer — But Not Any Primer

The primer you choose for glass skin matters more than the foundation. A mattifying primer is the wrong choice here — it actively fights against the luminous finish you are trying to build. A silicone-based smoothing primer is the right direction because it fills in texture and creates a blank canvas, but some silicone primers can look too flat under lighting.
The ideal primer for glass skin is a hydrating glow primer — something with a slight luminosity that blurs pores without adding heavy shimmer. If you cannot find a dedicated glow primer, a small amount of liquid highlighter mixed into your regular smoothing primer achieves a similar effect. The key word is “small amount” — you want a hint of glow in the primer, not a visible shimmer layer.
Apply a thin, even layer over the entire face. Do not skip the eyelids — glass skin is a full-face effect, and matte eyelids against glowing skin look disconnected. Blend the primer down onto your neck as well, especially if your foundation shade does not perfectly match your neck (which is true for most people).
Step 2: Foundation — Less Is More, Always
Full-coverage foundations are the enemy of glass skin. They are formulated to cover everything, which means they sit on top of the skin as a layer rather than merging with it. Glass skin requires a foundation that looks like it is part of the skin, not sitting on top of it.
The best foundation textures for glass skin, in order of preference:
- Tinted moisturizer: The lightest option. Provides just enough color to even out the skin tone without adding a detectable layer. Best for people with relatively even skin who just want a slight polish.
- Light-coverage liquid foundation: The middle ground. More coverage than a tinted moisturizer but still thin enough to let the skin’s natural texture show through. This is where most beginners should start.
- Skin tint: A newer category that sits between serum and foundation. Extremely thin, high in skincare ingredients, with just enough pigment to blur imperfections. Excellent for glass skin if you can find the right shade.
Application method matters as much as product choice. Dampen a beauty sponge slightly (not dripping — squeeze out most of the water) and bounce the foundation into the skin. Bouncing, not dragging, presses the product into the skin and creates a more natural finish. Use the sheerest layer you can get away with. If you need more coverage in specific areas, build it in those spots only rather than applying a thicker layer everywhere.
Step 3: Concealer — Only Where You Actually Need It
One of the biggest mistakes in glass skin routines is applying concealer over the entire under-eye area and then wondering why the face looks cakey. Glass skin works because of the contrast between the luminous base and the areas where the skin is allowed to show through naturally.
Apply concealer only on actual blemishes, visible dark circle areas (not the entire under-eye), and any redness around the nose or chin. Use a small flat brush or the pointed end of a beauty sponge for precise placement. Blend the edges until they disappear into the foundation — there should be no visible line where the concealer ends and the foundation begins.
For under-eye concealer specifically, choose a shade that is one to two shades lighter than your foundation, not three or four shades lighter. The dramatic brightening effect looks unnatural under the luminous finish of glass skin. A subtle brightening that matches the glow of the rest of the face reads as intentional, not overcorrected.
Step 4: The Glow Layer — This Is What Makes It Glass Skin

This is the step that separates glass skin from just “nice makeup.” The glow layer is where you strategically add luminosity to make the skin appear translucent and lit from within.
The technique is specific: you are not applying highlighter the way you would for a night-out look. Instead, you are placing a very thin, subtle glow in areas where light would naturally hit the face.
Where to apply:
- The highest points of the cheekbones — but blended outward, not concentrated in one spot
- The bridge of the nose — a thin line, blended so it is not a visible stripe
- The center of the forehead — just a small amount, blended well
- The cupid’s bow — barely there, just a touch
- The chin — only if your chin tends to look flat in photos
Where NOT to apply:
- The sides of the nose — this makes pores look larger
- Under the eyes — this makes texture and fine lines more visible
- The entire cheek area — this removes the dimension that makes glass skin look three-dimensional
Product choice for the glow layer: a liquid or cream highlighter is significantly better than powder for glass skin. Powder sits on top of the foundation as a separate layer, which works for a night-out highlight but breaks the seamless quality that glass skin requires. Liquid highlighter merges into the foundation and becomes part of the skin rather than sitting on it.
Apply the liquid highlighter with your fingers — the warmth helps it blend seamlessly. A tiny amount is enough. You can always add more, but removing excess liquid highlighter without disturbing the foundation underneath is difficult.
Step 5: Setting — The Controversial Step
Traditional glass skin purists will tell you not to set your makeup at all. For most people in real-world conditions — heat, humidity, touching your face, wearing a mask — this is impractical advice. Unset glass skin will slide off your face within three hours.
The solution is strategic setting. You are not dusting powder over the entire face. You are setting only the areas that tend to get oily or where makeup tends to migrate:
- The T-zone: forehead, nose bridge, chin
- Under the eyes (very lightly, to prevent concealer creasing)
Use a translucent setting powder — not a tinted one. A tinted powder adds a layer of opacity that works against the translucent quality of glass skin. Apply with a fluffy brush, not a dense one. A dense brush packs on too much product. A fluffy brush deposits a barely-there layer that controls oil without adding texture.
Then — and this is important — go back over the areas where you applied highlighter with a clean beauty sponge. Press gently. This removes any powder that landed on the highlight zones and reactivates the glow. This single step is what makes the difference between “dewy makeup that turned matte” and “glass skin that actually lasts.”
Step 6: Cream Blush — The Underrated Glass Skin Hero

Powder blush does not work well with glass skin. It adds a matte texture that breaks the seamless luminosity you have built. Cream or liquid blush is the right choice because it merges into the base rather than sitting on top of it.
The application method for cream blush in a glass skin routine is different from how you would normally apply it. Instead of placing it on the apples of the cheeks and blending upward, place it slightly higher — on the upper cheekbone area — and blend outward toward the temples. This positions the color where it catches light, which makes it look like a natural flush rather than applied color.
Use your fingers or a damp sponge. Fingers are better for cream blush because the warmth helps the product melt into the skin. Start with less than you think you need. Cream blush builds up quickly, and too much color under a glass skin base looks ruddy rather than glowing.
Good color choices for glass skin: soft pinks, peachy tones, and muted corals. Avoid deep berries or bright fuchsias — the intensity fights against the softness that makes glass skin work. The blush should look like you just came in from a light walk in cool weather, not like you applied color.
Step 7: Brows and Eyes — Keep Them Soft
Heavy eye makeup contradicts glass skin. The whole point of the look is that the skin is the star — everything else should support that, not compete with it.
Brows: A light, feathery brow using a fine-tip pencil or a small angled brush with powder. Fill in sparse areas only — do not redraw the entire brow shape. The arch should look natural, not sculpted. A clear brow gel to set the hairs is enough. Avoid heavy pomades or waxy pencils that make brows look painted on.
Eyes: A single matte or satin eyeshadow in a neutral tone — warm beige, soft brown, or muted taupe — swept across the lid and slightly into the crease. One color is enough. If you want more definition, a slightly deeper shade in the outer crease only, blended well so there are no visible lines. A thin brown eyeliner along the upper lash line (not black — brown is softer and more in keeping with the glass skin aesthetic) and mascara to finish. No dramatic wings, no cut creases, no heavy shimmer on the lids.
Step 8: Lips — The Finishing Touch
Glass skin lips should look hydrated and slightly plump, not matte and dry. A lip tint, a sheer lipstick, or a tinted lip balm all work. The color should be in the same soft family as your blush — pinks, peachy nudes, or sheer corals.
For an extra glass-like effect on the lips, apply a clear or slightly shimmery lip gloss over the tint. The gloss should be non-sticky — sticky gloss looks cheap and catches hair and dust. A hydrating lip oil or a lightweight gloss formula gives the plump, glassy lip look without the tackiness.
Avoid matte lipsticks entirely. They create a visual disconnect between the glowing skin and the flat, dry lips. If you must wear a matte formula (for longevity at an event, for example), apply a tiny dot of gloss just in the center of the lower lip to create the illusion of hydration without the full gloss commitment.
Products That Actually Work for Glass Skin (At Different Budgets)
You do not need expensive products to achieve glass skin. The technique matters more than the brand. That said, certain product types and textures work better than others regardless of price:
Under $15 Options
- e.l.f. Halo Glow Liquid Filter: Can be used as primer, mixed with foundation, or as the glow layer. Extremely versatile for the price.
- NYX Born to Glow Liquid Illuminator: Good liquid highlighter option for the glow step. Subtle enough for glass skin, buildable if you want more intensity.
- CeraVe Moisturizing Cream: Skincare prep does not need to be expensive. This is one of the most effective moisturizers for creating a smooth base, and it works under makeup without pilling.
- Wet n Wild Megaglow Highlighting Stick: Cream stick highlighter that works well for targeted glow placement.
$15-$35 Options
- Maybelline Fit Me Dewy + Smooth Foundation: One of the best drugstore foundations for glass skin. Light coverage, natural dewy finish, wide shade range.
- Rare Beauty Soft Pinch Tinted Lip Oil: Excellent for the glass skin lip step. Sheer color with a non-sticky glossy finish.
- Fenty Beauty Eaze Drop Blush: Liquid blush that blends beautifully into a glass skin base. Buildable, natural-looking flush.
- Ilia Super Serum Skin Tint: A true skin tint with SPF and skincare ingredients. Very thin, very natural — ideal for glass skin if the shade match works for you.
$35+ Options
- Charlotte Tilbury Flawless Filter: The product that popularized the “your skin but better” category. Works as primer, mixed with foundation, or alone. Expensive but effective.
- SAIE Glowy Super Gel: Lightweight gel highlighter that gives a very natural, skin-like glow without shimmer particles.
- Glossier Perfecting Skin Tint: Extremely minimal coverage that lets your skincare prep show through. Best for people who already have relatively even skin.
Common Glass Skin Mistakes to Avoid
- Skippping skincare prep: This is the number one reason glass skin fails. If your skin is dehydrated underneath, the makeup will look cakey and textured no matter what products you use.
- Using too many luminous products: Glow primer + luminous foundation + liquid highlighter + setting spray with glow = a face that looks wet, not glassy. Pick two glow products maximum.
- Applying highlighter under the eyes: This magnifies every fine line, crease, and texture issue. The under-eye area should stay matte or semi-matte.
- Using full-coverage foundation: Heavy foundation creates a layer on top of the skin. Glass skin requires products that merge with the skin, not sit on top of it.
- Not setting at all: Pure glass skin without any setting works in controlled environments (photo studios, air-conditioned rooms). In real life, it slides off. Strategic setting is the practical solution.
- Using powder highlighter: Powder adds texture. Liquid or cream highlighter merges into the base. For glass skin specifically, liquid is always the better choice.
- Ignoring the neck: Glowing face, matte neck is an instant giveaway that you are wearing luminous makeup. Blend everything down onto the neck.
How to Make Glass Skin Last All Day

The biggest complaint about glass skin is that it does not last. The glow fades, the foundation separates, and by midday you have a patchy, uneven base. This happens because glass skin relies on hydration, and hydration naturally decreases throughout the day as the skin absorbs and loses moisture.
A few strategies that actually extend wear:
- Spray setting spray before and after powder: A light mist of dewy setting spray before applying powder creates a tacky layer that helps the powder grip. Another mist after powder reactivates the glow. This two-step process significantly extends wear without adding visible product.
- Carry a hydrating mist: A small facial mist in your bag (rose water, glycerin-based mist, or even a hydrating setting spray) refreshed the glow midday without disturbing the makeup. Two sprays, pat gently with clean fingers, and the luminosity comes back.
- Blot, do not powder, for touch-ups: When your T-zone gets shiny (not glowy — there is a difference), use blotting paper, not powder. Blotting paper removes oil without adding texture. Powder builds up over multiple touch-ups and eventually looks cakey.
- Avoid touching your face: This applies to all makeup but matters more for glass skin because the products are designed to be thin and mergeable. Every time you touch your face, you are moving product around.
Glass Skin for Different Skin Types
Oily Skin
Glass skin is harder for oily skin but not impossible. The key is keeping the glow products away from your oil-prone zones (T-zone, chin) and concentrating them on the high points of the cheeks and forehead center. Use a water-based moisturizer instead of a richer cream. Set the T-zone more thoroughly. Accept that your glass skin will look slightly more “dewy” than someone with dry skin — that is fine, it is still glass skin, just your skin’s version of it.
Dry Skin
Dry skin has the easiest time achieving glass skin because the look is fundamentally about hydration. Your challenge is not creating glow — it is preventing the foundation from clinging to dry patches. Extra attention to exfoliation (gentle, not harsh) in your prep step, and a slightly richer moisturizer, will solve most issues.
Combination Skin
The most common skin type, and arguably the one that glass skin suits best. You can use the full technique — glow on the cheeks, strategic setting on the T-zone — without having to compensate for extreme oiliness or dryness. Follow the standard routine as described above.
Frequently Asked Questions
Can I get glass skin with drugstore products only?
Absolutely. The technique — proper prep, light layers, strategic glow placement, targeted setting — matters more than product price. The drugstore options listed above have been used by thousands of people to achieve convincing glass skin. Expensive products can make the process slightly easier or the finish slightly smoother, but they are not required.
Does glass skin work on mature skin?
Glass skin can actually be flattering on mature skin because the luminous finish draws attention away from texture and fine lines rather than highlighting them — as long as you avoid placing glow products directly over wrinkles or textured areas. Keep the glow on the high planes of the face (cheekbones, forehead center) and keep textured areas (under-eyes, around the mouth) more matte.
How is glass skin different from dewy skin?
Dewy skin is about surface sheen — the skin looks moist and reflective. Glass skin goes further: the skin appears translucent, smooth, and lit from within, as if light is passing through it rather than just reflecting off it. Glass skin typically requires more skincare prep and more precise product placement than a standard dewy look.
Can I wear glass skin makeup in summer without it melting off?
Yes, with adjustments. Use a water-based primer instead of silicone (silicone breaks down faster in heat). Switch from liquid highlighter to a cream stick — it is slightly more stable in high temperatures. Set the T-zone more thoroughly. Skip the heavy moisturizer in your prep and use a lighter gel-cream instead. Carry blotting papers and a hydrating mist for midday refreshes.
Do I need to do the full skincare routine every time?
No. The full cleanse-tone-serum-moisturize-sunscreen routine is ideal for your first application of the day. For touch-ups or reapplications, you can skip straight to a light mist of hydrating spray and then reapply only the areas that need it. The initial prep is what creates the base — once that base is in place, maintaining it requires much less effort.