


Winter braids fail for reasons that have nothing to do with braiding.
The coat collar eats the braid. The beanie flattens it. The static turns every loose strand into a balloon animal. Winter is the only season where the hairstyle fights the wardrobe, the weather, and the physics of indoor heating simultaneously — and the braid tutorials written for summer braids have no answers for any of it.
Here is what winter braiding actually needs: styles engineered around winter’s four enemies — the coat collar, the hat, the static, and the sweater friction. Each braid below was chosen because it survives one or all of them.
Seven braids, four enemies defeated. Let’s build.
Follow our Pinterest boards for daily hairstyle tutorials, and join us on Facebook so you never miss a seasonal guide.
The 30-Second Answer (Save This)

What makes a winter braid different? Three things — it sits above or clears the coat collar, it survives the beanie being pulled on and off, and it fights static with product, not hope.
The best all-round winter braid: the low inverted side braid — collar-clear, hat-compatible, static-resistant.
The prep that fixes static: a drop of oil on the hands, smoothed over the surface — thirty seconds before any braid.
That is the summary. The seven builds follow.
Winter’s Four Enemies (Why Normal Braids Fail)

Enemy 1 — the coat collar. High collars push long braids forward and chew their ends. The braid that clears or tucks above the collar survives; the one that dangles into it dissolves by lunch.
Enemy 2 — the hat. Beanies and berets compress crown volume and flatten everything beneath. Braids built flat at the crown emerge intact; volume-dependent styles emerge squashed.
Enemy 3 — static. Indoor heating turns hair into a charged field. Braids on static hair pull frizz into every strand line, and the style that was clean at home reads fuzzy by the office.
Enemy 4 — sweater friction. Wool collars and scarves rub the hair at the neck all day — the friction zone where every braid’s end frays first.
Four enemies, seven solutions. Every braid below names which enemies it defeats.
Braid 1: The Low Inverted Side Braid (Defeats All Four)

The winter champion — the braid that answers every enemy in one style.
The build: deep side part, gather hair at one side below ear level, and Dutch-braid it downward — inverted so the braid sits raised and tight against the head. Secure low at the shoulder, before the collar zone begins.
Enemy check: collar — the braid sits above the high-collar zone when positioned right. Hat — the flat Dutch structure compresses gracefully. Static — the tight braid traps loose strands. Sweater friction — the braid’s end rests at mid-chest, past the scarf zone.
The step sequence: part deep → gather low-side → Dutch braid downward → secure at mid-chest → one oil drop over the surface → done in seven minutes.
Braid 2: The Hat-Proof Flat Dutch
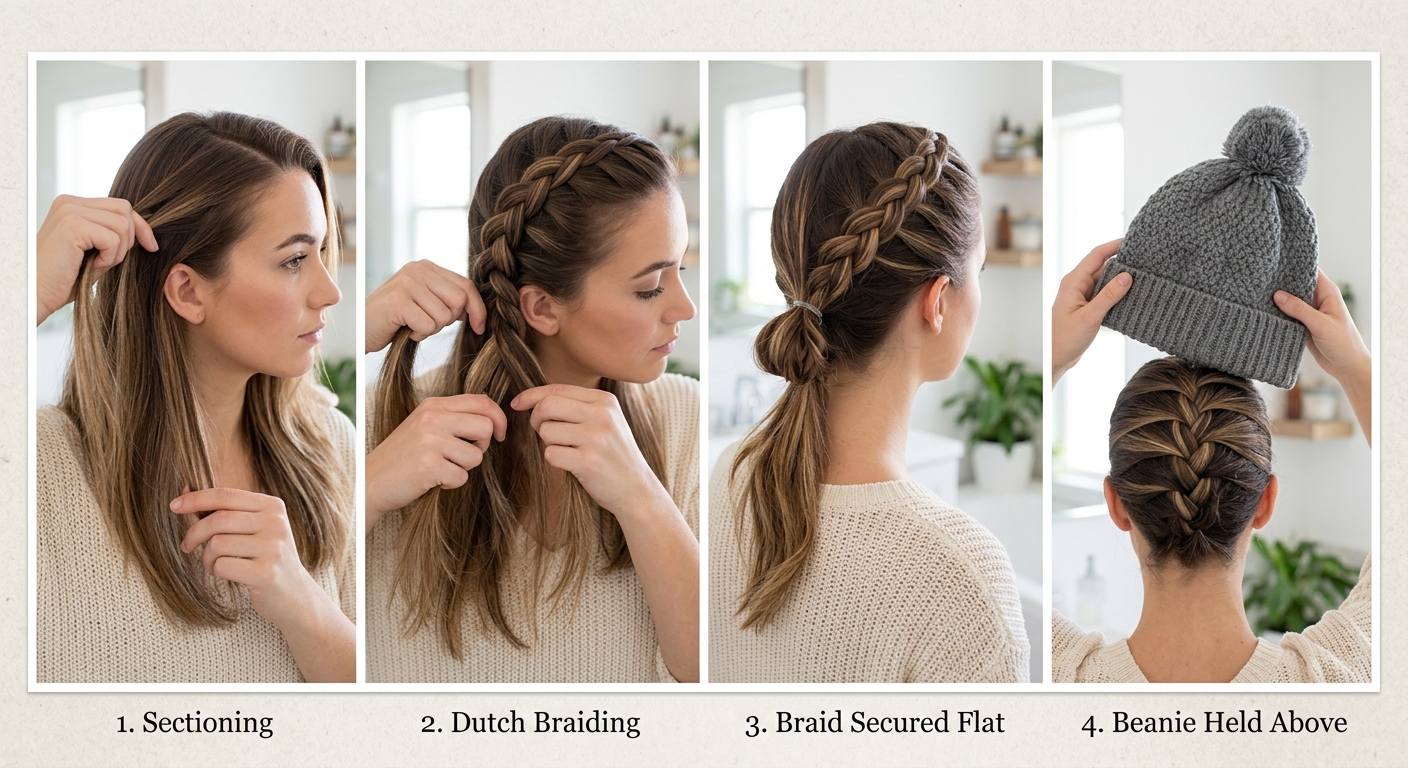
Built for the beanie-wearing months — the braid that emerges from the hat looking intentional.
The build: a flat Dutch braid running straight back from the hairline to the nape, kept flat against the head — no crown volume, no puff. The braid below the hat’s edge continues in a standard three-strand to the end.
The hat logic: styles built flat at the crown are the ones that survive hat compression — the volume-dependent styles flatten permanently. The flat Dutch’s crown sits below the beanie line by design, and the braid’s texture is the reveal when the hat comes off.
The reveal moment: hat off indoors, and the braid’s texture reads styled rather than squashed — the hat-compatibility that styles from our thanksgiving hairstyles guide pioneered, in winter braid form.
Braid 3: The Collar-Clear Crown Braid

The braid that lives above every collar — the crown placement winter forgot to threaten.
The build: a crown braid — Dutch braids from both temples traveling around the head’s top like a laurel, pinned where they meet. Everything sits above the collar line by design.
The enemy check: collar — untouchable at crown height. Hat — works with loose beanies that clear the braid. Static — the tight braid traps the strands. Sweater friction — nothing near the friction zone.
The styling note: the crown braid pairs with every winter neckline — turtlenecks, coats, sweaters — because it simply lives above them all. The updo-braid hybrid that reads intentional under every winter garment.
Braid 4: The Scarf-Woven Braid (Static’s Nemesis)

The braid with static’s counter-weapon woven in — the winter’s most clever build.
The build: braid the hair in a standard three-strand, but thread a satin ribbon through as the fourth strand — the satin’s smooth surface fights the static that cotton and wool ribbons would feed. Secure at the end with the ribbon’s bow.
The static science: static builds on friction between hair and synthetic fabrics — the satin ribbon introduces a zero-friction element into the braid itself. Static’s enemy woven into the style, and the bow at the end is the bonus.
The pairing: this braid beside the velvet scarves from our thanksgiving cozy accessories guide — the woven-ribbon build reads styled, not just protected.
Braid 5: The Chunky Sweater-Proof Braid

The braid built for the friction zone — thick enough that sweater wool has nothing to fray.
The build: a large, loose three-strand braid — sections deliberately thick, pull-apart edges generous. The braid’s own mass is its armor: chunky braids resist the friction fraying that thin braids surrender to.
The sweater logic: wool rubs thin braids into frizz because each strand catches individually — a chunky braid’s strands move as one mass. The thickness is the defense, and the pull-apart texture is the style.
The hold note: chunky braids need the strongest elastic you own — the weight is real, and the flimsy elastic surrenders by noon. Our cute easy hairstyles guide’s elastic advice doubles here.
Braid 6: The Double Braid Cold-Front Build

The two-braid build for the genuinely cold weeks — symmetry that reads intentional under every hat.
The build: two Dutch braids running from front hairline to nape on either side of a center part — the pigtail-braid structure, low and tight. Secure both at the nape, tuck the ends under and pin.
The hat logic: two flat braids under a beanie compress symmetrically — the reveal when the hat comes off is two clean braided lines, not one squashed style. The symmetry survives what single styles cannot.
The winter history: this build is winter’s oldest braid — the structure that kept hair managed through centuries of cold, updated with the Dutch tension that keeps it modern.
Braid 7: The Fishtail Under-Coat Braid

The elegant option engineered around the coat — the braid positioned where coats cannot reach.
The build: a fishtail braid — two strands with small alternating crossings — built low at the nape, positioned to rest against the chest below the collar line. Pull-apart gently for width, and let the coat hang open around it.
The fishtail advantage: the fishtail’s tight weave frays slower than any three-strand — the structure is the survival feature. And the chest-level position is the one zone every open-coat outfit leaves accessible.
The elegant note: the fishtail reads evening-appropriate where chunky braids read casual — the braid for the winter dinners, the holiday events, and the December evenings that deserve more than a ponytail. The fishtail from our thanksgiving braided updo guide, repositioned for winter.
The Winter Braid Prep (Before Any Build)

The two-minute prep that every braid above assumes — static’s counter-offensive.
Step 1: one drop of oil or hair serum on the palms, smoothed over the hair’s surface — the anti-static shield applied before braiding. Static prevents itself; it does not cure.
Step 2: brush with a boar-bristle or wooden brush — plastic brushes generate the static they should be solving. The tool choice is the first static decision.
Step 3: braid day-two hair. The natural grip of second-day hair holds braid tension that freshly washed hair releases — the same day-old advantage every braid in our fall hairstyles 2026 guide uses.
Three prep steps, ninety seconds, and every braid above starts from a static-resistant foundation.
Winter Braid FAQ
What is the best braid for winter?
The low inverted side braid — it clears the coat collar, survives hat compression, traps static-prone strands, and rests past the scarf friction zone. One braid defeating all four winter enemies, built in seven minutes from a deep side part.
How do I stop static in my braids during winter?
Oil on the palms smoothed over the hair before braiding, a wooden or boar-bristle brush instead of plastic, and the satin-ribbon-woven braid for the worst static days. Static prevents itself before braiding; it never cures after.
What braid survives wearing a hat?
The flat Dutch braid built deliberately flat at the crown — styles constructed flat under the hat line emerge intact when it comes off. Volume-dependent braids flatten permanently; the flat Dutch’s texture is the reveal, not the casualty.
Where should a braid sit to avoid the coat collar?
Above the collar line at crown height, or below it at chest level past the scarf zone — the two coat-safe positions. The braid that dangles exactly at collar height is the one the coat eats by lunch.
How do I protect braids from sweater friction?
The chunky braid — thick sections move as one mass instead of catching strand by strand. Position the braid’s end past the scarf zone, and refresh with one oil drop when the surface starts reading fuzzy.
More questions? Ask us on Facebook and we will match a braid to your coat, your hat, and your static level.

The Braid That Out-Thinks Winter
Seven braids, four enemies, and the prep that starts before the first strand crosses — winter hair braid tutorials stop failing the moment the season’s real obstacles get names.
Tonight, prep the oil. This week, build the champion braid once. And all winter, the braids that used to dissolve by lunch will be the ones still standing at dinner — collar-cleared, hat-tested, static-defeated.
Save this guide to our Pinterest boards so it is on your phone all season, and pair the braids with the cut that grows into them from our butterfly haircut guide and the season’s full styling in our winter hair care routine guide — the braids built, the hair beneath them protected.
New seasonal tutorials every week. Stay braided, stay warm! 🧶
[…] hair strategy: drizzle frizzes without soaking — a low bun or braid from our winter hair braid guide keeps the hair controlled, and the short styles from our cute easy hairstyles guide pair with […]
[…] winter hats revive with the same water spritz and a re-scrunch — the winter survival from our winter hair braid guide’s hat-reveal section, wave […]